Does your photos look a little dead? How do you turn a dull and lifeless picture into a snapshot of warmness and contrast. Sure you can find the perfect day with the perfect setting, but not everyone has the opportunity to spend their time waiting for the sun to come down at the right angle. But Photoshop can help. Using the color balance tool, you can do more than just changing colors. Here’s a quick 1min way of boosting the life of your photos.
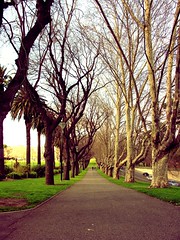
Turning this into this

Watch the screencast/video of how to do this.
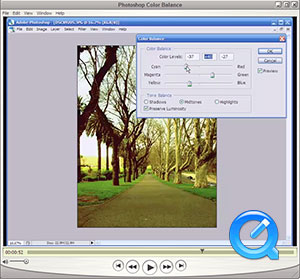
Click image to play video. (Quicktime H.264, 1:19min)
Here are the steps:
- Open your photo in Photoshop. Duh.
- Go to Edit > Adjustments and > Color Balance
- I prefer to start with the “Shadows” properties. But you can also start with the “Highlights” properties.
- There is no rule to this. Grab a slider and pull it. Experiment with each slider to find the effect that you like. Once you’re finished with a slider, move on to the next one.
- Then move on to to the opposite tone balance. “Highlights” in this case.
- TIP: You should notice here that the “Yellow” slider has a significant effect on the brightness of the photo. Even though you are only changing the color, it can also have a strong impact on the luminosity of the photo.
- Then move on to “Midtones”, and experiment again.
- Feel free to go back to the “Shadows” or “Highlights” to make adjustments so you get the result you want.
- Okay and you’re done.
Happy color-balancing!
You help noobs like myself. /me bows to the master.
Very well explained… improved an old snap of mine vastly 😀